Creating a raster mosaic
Quite often you need to merge multiple raster files together and create a raster mosaic. This can be done
easily with the merge() function in Rasterio.
Here, we will create a mosaic based on 2X2m resolution DEM files (altogether 12 files) covering the Helsinki Metropolitan region. If you have not downloaded the DEM files yet, you can do that by running the script from Automatize data download section.
- Let’s start by importing required modules and functions.
In [1]: import rasterio

In [2]: from rasterio.merge import merge

In [3]: from rasterio.plot import show

In [4]: import glob

In [5]: import os
As there are many tif files in our folder, it is not really pracical to start listing them manually. Luckily,
we have a module and function called glob that can be used to create a list of those files that we are interested
in based on search criteria.
- Find all
tiffiles from the folder where the file starts withL-letter.
# File and folder paths
In [6]: dirpath = r"C:\HY-DATA\HENTENKA\KOODIT\Opetus\Automating-GIS-processes\Data\CSC_Lesson6"

In [7]: out_fp = r"C:\HY-DATA\HENTENKA\KOODIT\Opetus\Automating-GIS-processes\Data\CSC_Lesson6\Helsinki_DEM_2x2m_Mosaic.tif"

# Make a search criteria to select the DEM files
In [8]: search_criteria = "L*.tif"

In [9]: q = os.path.join(dirpath, search_criteria)

In [10]: print(q)
C:\HY-DATA\HENTENKA\KOODIT\Opetus\Automating-GIS-processes\Data\CSC_Lesson6\L*.tif
Now we can see that we have a search criteria (q) that we can pass to glob function.
- List all dem files with glob() function
In [11]: dem_fps = glob.glob(q)

In [12]: dem_fps
Out[12]:
['C:\\HY-DATA\\HENTENKA\\KOODIT\\Opetus\\Automating-GIS-processes\\Data\\CSC_Lesson6\\L4133A.tif',
 'C:\\HY-DATA\\HENTENKA\\KOODIT\\Opetus\\Automating-GIS-processes\\Data\\CSC_Lesson6\\L4133B.tif',
 'C:\\HY-DATA\\HENTENKA\\KOODIT\\Opetus\\Automating-GIS-processes\\Data\\CSC_Lesson6\\L4133C.tif',
 'C:\\HY-DATA\\HENTENKA\\KOODIT\\Opetus\\Automating-GIS-processes\\Data\\CSC_Lesson6\\L4133D.tif',
 'C:\\HY-DATA\\HENTENKA\\KOODIT\\Opetus\\Automating-GIS-processes\\Data\\CSC_Lesson6\\L4133E.tif',
 'C:\\HY-DATA\\HENTENKA\\KOODIT\\Opetus\\Automating-GIS-processes\\Data\\CSC_Lesson6\\L4133F.tif',
 'C:\\HY-DATA\\HENTENKA\\KOODIT\\Opetus\\Automating-GIS-processes\\Data\\CSC_Lesson6\\L4134A.tif',
 'C:\\HY-DATA\\HENTENKA\\KOODIT\\Opetus\\Automating-GIS-processes\\Data\\CSC_Lesson6\\L4134B.tif',
 'C:\\HY-DATA\\HENTENKA\\KOODIT\\Opetus\\Automating-GIS-processes\\Data\\CSC_Lesson6\\L4134C.tif',
 'C:\\HY-DATA\\HENTENKA\\KOODIT\\Opetus\\Automating-GIS-processes\\Data\\CSC_Lesson6\\L4134D.tif',
 'C:\\HY-DATA\\HENTENKA\\KOODIT\\Opetus\\Automating-GIS-processes\\Data\\CSC_Lesson6\\L4134E.tif',
 'C:\\HY-DATA\\HENTENKA\\KOODIT\\Opetus\\Automating-GIS-processes\\Data\\CSC_Lesson6\\L4134F.tif']
Great! Now we have all those 12 files in a list and we can start to make a mosaic out of them.
- Let’s first create an empty list for the datafiles that will be part of the mosaic.
In [13]: src_files_to_mosaic = []
- Now we open all those files in read mode with raterio and add those files into a our source file list.
In [14]: for fp in dem_fps:
   ....:     src = rasterio.open(fp)
   ....:     src_files_to_mosaic.append(src)
   ....:

In [15]: src_files_to_mosaic
Out[15]:
[<open RasterReader name='C:\HY-DATA\HENTENKA\KOODIT\Opetus\Automating-GIS-processes\Data\CSC_Lesson6\L4133A.tif' mode='r'>,
 <open RasterReader name='C:\HY-DATA\HENTENKA\KOODIT\Opetus\Automating-GIS-processes\Data\CSC_Lesson6\L4133B.tif' mode='r'>,
 <open RasterReader name='C:\HY-DATA\HENTENKA\KOODIT\Opetus\Automating-GIS-processes\Data\CSC_Lesson6\L4133C.tif' mode='r'>,
 <open RasterReader name='C:\HY-DATA\HENTENKA\KOODIT\Opetus\Automating-GIS-processes\Data\CSC_Lesson6\L4133D.tif' mode='r'>,
 <open RasterReader name='C:\HY-DATA\HENTENKA\KOODIT\Opetus\Automating-GIS-processes\Data\CSC_Lesson6\L4133E.tif' mode='r'>,
 <open RasterReader name='C:\HY-DATA\HENTENKA\KOODIT\Opetus\Automating-GIS-processes\Data\CSC_Lesson6\L4133F.tif' mode='r'>,
 <open RasterReader name='C:\HY-DATA\HENTENKA\KOODIT\Opetus\Automating-GIS-processes\Data\CSC_Lesson6\L4134A.tif' mode='r'>,
 <open RasterReader name='C:\HY-DATA\HENTENKA\KOODIT\Opetus\Automating-GIS-processes\Data\CSC_Lesson6\L4134B.tif' mode='r'>,
 <open RasterReader name='C:\HY-DATA\HENTENKA\KOODIT\Opetus\Automating-GIS-processes\Data\CSC_Lesson6\L4134C.tif' mode='r'>,
 <open RasterReader name='C:\HY-DATA\HENTENKA\KOODIT\Opetus\Automating-GIS-processes\Data\CSC_Lesson6\L4134D.tif' mode='r'>,
 <open RasterReader name='C:\HY-DATA\HENTENKA\KOODIT\Opetus\Automating-GIS-processes\Data\CSC_Lesson6\L4134E.tif' mode='r'>,
 <open RasterReader name='C:\HY-DATA\HENTENKA\KOODIT\Opetus\Automating-GIS-processes\Data\CSC_Lesson6\L4134F.tif' mode='r'>]
Okey, now we can see that we have a list full of open raster objects.
- Now it is really easy to merge those together and create a mosaic with rasterio’s
mergefunction.
# Merge function returns a single mosaic array and the transformation info
In [16]: mosaic, out_trans = merge(src_files_to_mosaic)
- Let’s check that it looks okey.
In [17]: show(mosaic, cmap='terrain')
Out[17]: <matplotlib.axes._subplots.AxesSubplot at 0x20c996d2198>
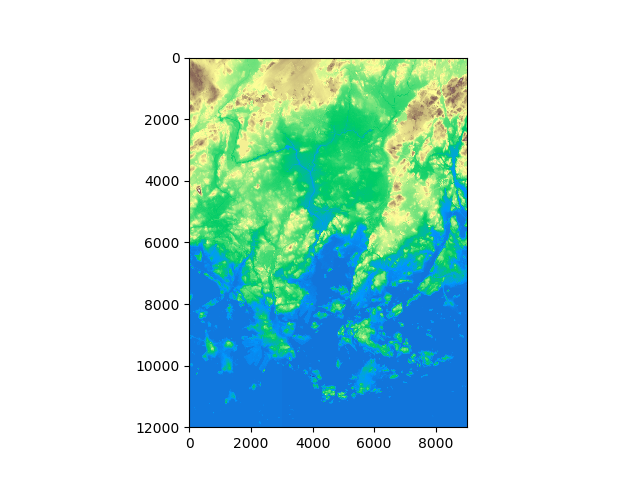
Great, it looks correct! Now we are ready to save our mosaic to disk.
- Let’s first update the metadata with our new dimensions, transform and CRS
# Copy the metadata
In [18]: out_meta = src.meta.copy()

# Update the metadata
In [19]: out_meta.update({"driver": "GTiff",
   ....:                  "height": mosaic.shape[1],
   ....:                  "width": mosaic.shape[2],
   ....:                  "transform": out_trans,
   ....:                  "crs": "+proj=utm +zone=35 +ellps=GRS80 +units=m +no_defs "
   ....:                  }
   ....:                 )
   ....:
- Finally we can write our mosaic to our computer
# Write the mosaic raster to disk
In [20]: with rasterio.open(out_fp, "w", **out_meta) as dest:
   ....:     dest.write(mosaic)
   ....:
That’s it! Easy!