Installing Python + GIS
How to start doing GIS with Python on your own computer?
Well, first you need to install Python and necessary Python modules that are used to perform various GIS-tasks. The purpose of this page is to help you out installing Python and all those modules into your own computer. Even though it is possible to install Python from their homepage, we highly recommend using Anaconda which is an open source distribution of the Python and R programming languages for large-scale data processing, predictive analytics, and scientific computing, that aims to simplify package management and deployment. In short, it makes life much easier when installing new tools on your Python to play with.
Install Python + GIS on Windows
Following steps have been tested to work on Windows 7 and 10 with Anaconda3 64 bit, using conda v4.3.29 (30th October 2017).
Download Anaconda installer (64 bit) for Windows.
Install Anaconda to your computer by double clicking the installer and install it into a directory you want (needs admin rights). Install it to all users and use default settings.
Note
Note for University of Helsinki workers: you need to set the installation location as C:\HYapp so that it can be used easily by anyone without the need to
pass admin credentials all the time. If you don’t have C:\HYapp -folder, create one with admin rights.
Test that the Anaconda´s package manage called conda works by opening a command prompt as a admin user
and running command conda --version.
Install GIS related packages with conda (and pip) by running in command prompt following commands (in the same order as they are listed):
# Install numpy (v 1.13.1)
conda install numpy

# Install pandas (v 0.20.3) --> bundled with python-dateutil (v 2.6.1) and pytz (v 2017.2)
conda install pandas

# Install scipy (v 0.19.1)
conda install scipy

# Install matplotlib (v 2.0.2) --> bundled with cycler, freetype, icu, jpeg, libpng, pyqt, qt, sip, sqlite, tornado, zlib
conda install matplotlib

# Install scikit-learn (v 0.19.0)
conda install scikit-learn

# Install networkx (v 1.11) --> bundled with decorator (v 4.1.2)
conda install networkx

# Install bokeh (v 0.12.9) --> bundled with jinja2, markupsafe, pyyaml, yaml -packages
conda install bokeh

# Install statsmodels (v 0.8.0) --> bundled with patsy (0.4.1)
conda install statsmodels

# Install PySpark (v 2.2.0) --> bundled with py4j (v 0.10.6)
conda install pyspark

# Install Geopandas (v 0.3.0) --> bundled with click, click-plugins, cligj, curl, descartes, expat, fiona, freexl, gdal, geos, hdf4, hdf5, kealib, krb5, libiconv, libnetcdf, libpq, libspatialindex, libspatialite, libtiff, libxml2, munch, openjpeg, pcre, proj4, psycopg2, pyproj, pysal, rtree, shapely, sqlalchemy, xerces-c
conda install -c conda-forge geopandas

# Install cartopy (v 0.15.1) --> bundled with libxslt, lxml, olefile, owslib, pillow, pyepsg, pyshp
conda install -c conda-forge cartopy

# Install geoplot (v 0.0.4) using pip (on Linux: be sure to use pip that comes with conda distribution!) --> bundled with seaborn
pip install geoplot

# Install osmnx (v 0.5.4) --> bundled with altair, bleach, branca, colorama, entrypoints, folium, geopy, html5lib, ipykernel, ipython, ipython_genutils, jedi, jsonschema, jupyter_client, jupyter_core, mistune, nbconvert, nbformat, notebook, pandoc, pandocfilters, pickleshare, prompt_toolkit, pygments, pyzmq, simplegeneric, testpath, traitlets, vega, vincent, wcwidth, webencodings
conda install -c conda-forge osmnx

# Install Folium (v 0.5.0) --> bundled with altair, vega
conda install -c conda-forge folium

# Install Rasterio (v. 0.36) --> bundled with attrs
conda install -c conda-forge rasterio

# Install Rasterstats (v. 0.12.0) --> bundled with simplejson
conda install -c conda-forge rasterstats

# Install Dash using Pip
pip install dash==0.19.0  # The core dash backend
pip install dash-renderer==0.11.1  # The dash front-end
pip install dash-html-components==0.8.0  # HTML components
pip install dash-core-components==0.14.0  # Supercharged components
pip install plotly --upgrade  # Plotly graphing library

# Install PyCRS (v. 1.3) using Pip (a fixed version from mullenkamp)
pip install https://github.com/mullenkamp/PyCRS/archive/master.zip
Test that everything works
You can test that the installations have worked by running following commands in your IPython console (comes with mini-conda).
import numpy as np
import pandas as pd
import geopandas as gpd
import scipy
import shapely
import matplotlib.pyplot as plt
import pysal
import bokeh
import cartopy
import statsmodels
import sklearn
import geoplot
import osmnx
import folium
import dash
import rasterio
import rasterstats
If you don’t receive any errors, everything should be working!
Install Python + GIS on Linux / Mac
The following have been tested on Ubuntu 16.04. Might work also on Mac (not tested yet).
Install Anaconda 3 and add it to system path
# Download and install Anaconda
sudo wget https://repo.continuum.io/archive/Anaconda3-4.1.1-Linux-x86_64.sh
sudo bash Anaconda3-4.1.1-Linux-x86_64.sh

# Add Anaconda installation permanently to PATH variable
nano ~/.bashrc

# Add following line at the end of the file and save (EDIT ACCORDING YOUR INSTALLATION PATH)
export PATH=$PATH:/PATH_TO_ANACONDA/anaconda3/bin:/PATH_TO_ANACONDA/anaconda3/lib/python3.5/site-packages
Install Python packages
Install GIS related packages with conda (and pip) by running in command prompt following commands (in the same order as they are listed):
# Install numpy (v 1.13.1)
conda install numpy

# Install pandas (v 0.20.3) --> bundled with python-dateutil (v 2.6.1) and pytz (v 2017.2)
conda install pandas

# Install scipy (v 0.19.1)
conda install scipy

# Install matplotlib (v 2.0.2) --> bundled with cycler, freetype, icu, jpeg, libpng, pyqt, qt, sip, sqlite, tornado, zlib
conda install matplotlib

# Install scikit-learn (v 0.19.0)
conda install scikit-learn

# Install networkx (v 1.11) --> bundled with decorator (v 4.1.2)
conda install networkx

# Install bokeh (v 0.12.9) --> bundled with jinja2, markupsafe, pyyaml, yaml -packages
conda install bokeh

# Install statsmodels (v 0.8.0) --> bundled with patsy (0.4.1)
conda install statsmodels

# Install PySpark (v 2.2.0) --> bundled with py4j (v 0.10.6)
conda install pyspark

# Install Geopandas (v 0.3.0) --> bundled with click, click-plugins, cligj, curl, descartes, expat, fiona, freexl, gdal, geos, hdf4, hdf5, kealib, krb5, libiconv, libnetcdf, libpq, libspatialindex, libspatialite, libtiff, libxml2, munch, openjpeg, pcre, proj4, psycopg2, pyproj, pysal, rtree, shapely, sqlalchemy, xerces-c
conda install -c conda-forge geopandas

# Install cartopy (v 0.15.1) --> bundled with libxslt, lxml, olefile, owslib, pillow, pyepsg, pyshp
conda install -c conda-forge cartopy

# Install geoplot (v 0.0.4) using pip (on Linux: be sure to use pip that comes with conda distribution!) --> bundled with seaborn
pip install geoplot

# Install osmnx (v 0.5.4) --> bundled with altair, bleach, branca, colorama, entrypoints, folium, geopy, html5lib, ipykernel, ipython, ipython_genutils, jedi, jsonschema, jupyter_client, jupyter_core, mistune, nbconvert, nbformat, notebook, pandoc, pandocfilters, pickleshare, prompt_toolkit, pygments, pyzmq, simplegeneric, testpath, traitlets, vega, vincent, wcwidth, webencodings
conda install -c conda-forge osmnx

# Install Folium (v 0.5.0) --> bundled with altair, vega
conda install -c conda-forge folium

# Install Dash using Pip
pip install dash==0.19.0  # The core dash backend
pip install dash-renderer==0.11.1  # The dash front-end
pip install dash-html-components==0.8.0  # HTML components
pip install dash-core-components==0.14.0  # Supercharged components
pip install plotly --upgrade  # Plotly graphing library
How to find out which conda -command to use when installing a package?
The easiest way
The first thing to try when installing a new module X is to run in a command prompt (as admin) following command (here we try to install a hypothetical
module called X)
conda install X
In most cases this approach works but sometimes you get errors like (example when installing a module called shapely):
C:\WINDOWS\system32>conda install shapely
Using Anaconda API: https://api.anaconda.org
Fetching package metadata .........
Solving package specifications: .
Error: Package missing in current win-64 channels:
  - shapely

You can search for packages on anaconda.org with

    anaconda search -t conda shapely
Okey, so conda couldn’t find the shapely module from the typical channel it uses for downloading the module.
Alternative way to install if typical doesn’t work
How to find a way to install a module if it cannot be installed on a typical way? Well, the answer is the same is in many other cases nowadays, Google it!
Let’s find our way to install the Shapely module by typing following query to Google:

Okey, we have different pages showing how to install Shapely using conda package manager.
Which one of them is the correct one to use?
We need to check the operating system banners and if you find a logo of the operating system of your computer, that is the one to use! Thus, in our case the first page that Google gives does not work in Windows but the second one does, as it has Windows logo on it:
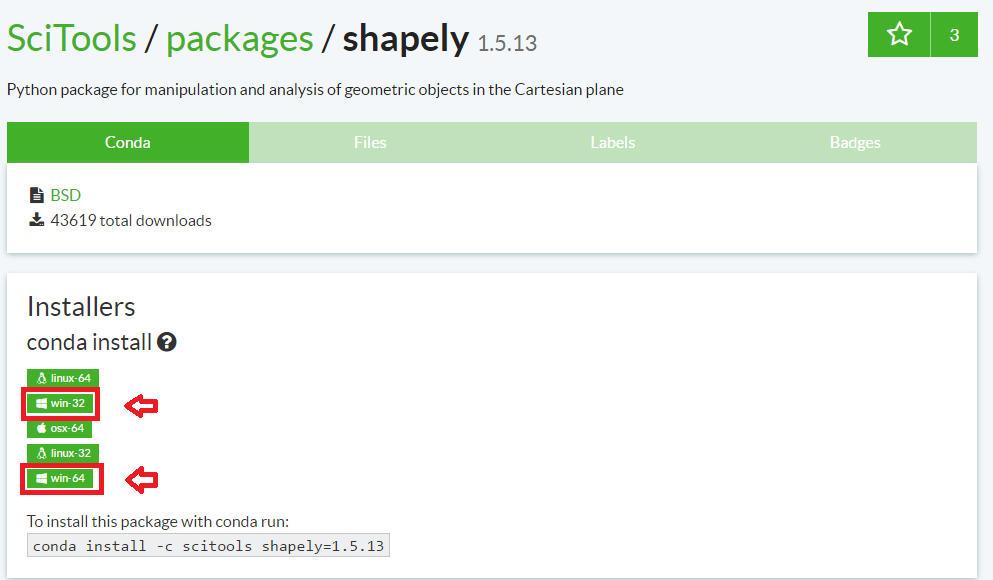
From here we can get the correct installation command for conda and it works!

You can follow these steps similarly for all of the other Python modules that you are interested to install.