Writing arcpy scripts
At this point we have created a nice interface for our Python tool in ArcGIS:
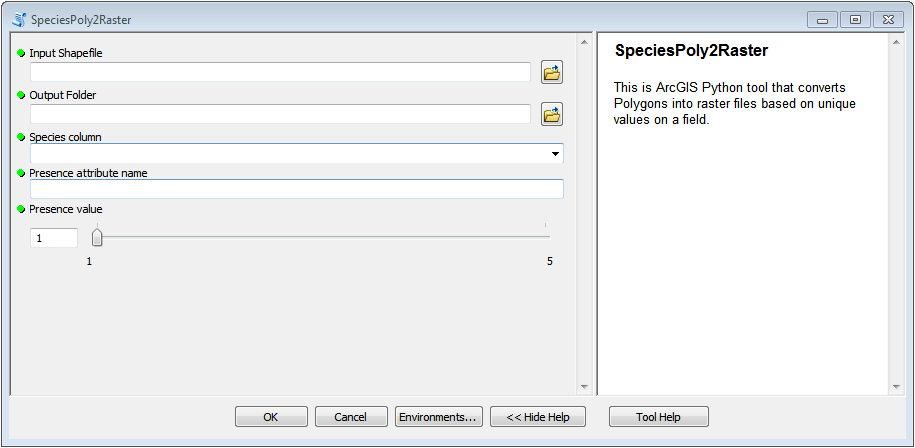
Now we need to write the functionalities for our tool. The aim of our tool is to convert Shapefiles into rasters and give the raster a value that the user specifies in the user interface. Let’s see how this can be done.
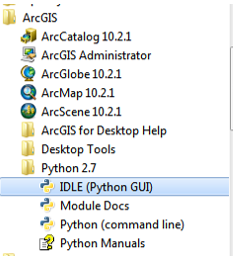
First, we need start the ArcGIS IDLE (if it is not open already) from All Programs –> ArcGIS:
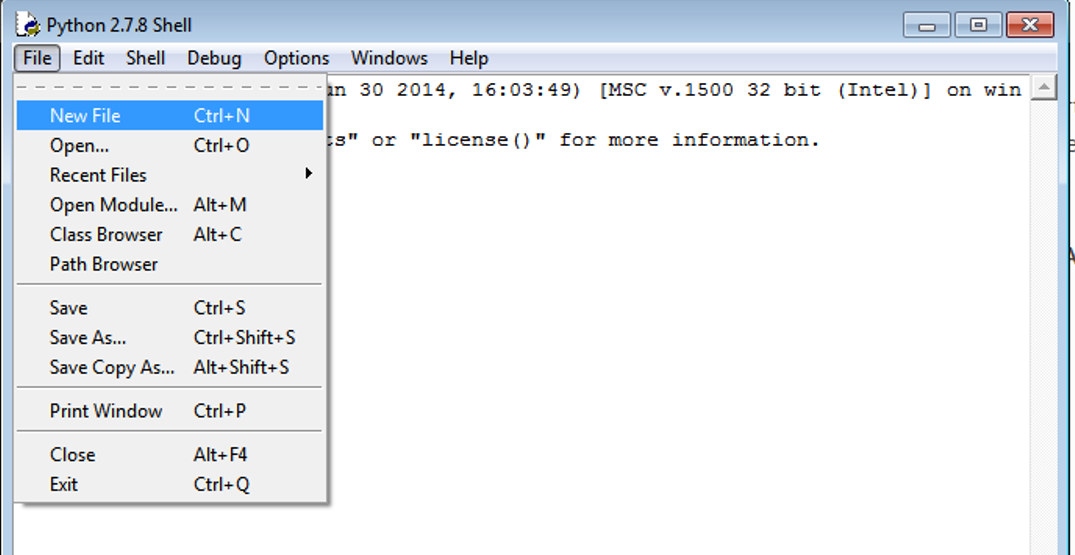
Create a new script called PolyToRaster.py in IDLE (File –> New File) and save it to your computer:
Let’s start writing the functionalities of our tool to the script that we just created.
Importing arcpy
First thing to do is to import the arcpy module:
# Import arcpy module so we can use ArcGIS geoprocessing tools
import arcpy
import os
Note
Notice that arcpy can only be imported with Python interpreter that comes with ArcGIS. If you try to import it e.g. in Spyder, you will receive an error ImportError: No module named 'arcpy'.
Well...actually there is a way to import arcpy from other places as well and also import it into Spyder but this is not a topic of this course.
Getting parameters from the toolbox
Before we can do anything with our tool and our nice interface for it, we need to get those parameters into our script. This can be done by using arcpy’s function called .GetParameterAsText() where the index
value of the parameter is passed to the function (where number 0 is the first parameter). ArcGIS has a good documentation that should be used for searching the information about how different functions are used.
Let’s import those five parameters from the graphical interface into our Python script using GetParameterAsText() -function:
# 1. Get parameters from the toolbox using 'GetParametersAsText' method
#----------------------------------------------------------------------
# --> check ArcGIS help for info how to use methods
# Method info: http://desktop.arcgis.com/en/arcmap/latest/analyze/arcpy-functions/getparameterastext.htm

input_species_shp = arcpy.GetParameterAsText(0)
output_folder = arcpy.GetParameterAsText(1)
species_attribute = arcpy.GetParameterAsText(2)
attribute_name = arcpy.GetParameterAsText(3)
presence_value = arcpy.GetParameterAsText(4)
Adding a new field into attribute table
Next, we need to add a new field that is called in a way that the user wants it. The field name is stored in the attribute_name variable. Adding new column can be done by using a function called AddField_management()
(see help).
# 2. Add a new field into the input shapefile with 'AddField_management' method
#------------------------------------------------------------------------------
# Method info: http://desktop.arcgis.com/en/arcmap/latest/tools/data-management-toolbox/add-field.htm

arcpy.AddField_management(in_table=input_species_shp, field_name=attribute_name, field_type="SHORT") # Other possible parameters can be left as default
Updating column with Field Calculator
Let’s update the newly created column with the Presence value that was asked from the user and will be assigned to the raster cells. We can do calculations in attribute table with CalculateField_management() -function. Let’s update the column with value that is stored in presence_value variable.
# 3. Update the presence value for our newly created attribute with 'CalculateField_management' method
#-----------------------------------------------------------------------------------------------------
# Method info: http://desktop.arcgis.com/en/arcmap/latest/tools/data-management-toolbox/calculate-field.htm

arcpy.CalculateField_management(in_table=input_species_shp, field=attribute_name, expression=presence_value)
Iterating over values in attribute table
As we wanted to save individual species into separate raster files, we need to determine the unique species in our attribute table. In Pandas / Geopandas there is a nice function called .unique()
for this purpose but unfortunately arcpy does not have such a function that would work with Shapefiles. Hence, we need to create the “unique” -function ourselves.
Let’s create a function that iterates over the values in a column and returns a list of unique values that are present in that column. We can iterate over the rows in attribute table by using SearchCursor() -function (read-only) in arcpy.
#-----------------------------------------------------------------------------------------------------------------------------------
# 4. Get a list of unique species in the table using 'SearchCursor' method
#   Method info: http://desktop.arcgis.com/en/arcmap/latest/analyze/arcpy-data-access/searchcursor-class.htm
#   More elegant version of the function in ArcPy Cafe: https://arcpy.wordpress.com/2012/02/01/create-a-list-of-unique-field-values/
# ----------------------------------------------------------------------------------------------------------------------------------

# 4.1 CREATE a function that returns unique values of a 'field' within the 'table'
def unique(table, field):

    # Create a cursor object for reading the table
    cursor = arcpy.da.SearchCursor(table, [field]) # A cursor iterates over rows in table

    # Create an empty list for unique values
    unique_values = []

    # Iterate over rows and append value into the list if it does not exist already
    for row in cursor:
        if not row[0] in unique_values: # Append only if value does not exist
            unique_values.append(row[0])
    return sorted(unique_values) # Return a sorted list of unique values
Let’s apply our function in following manner:
# 4.2 USE the function to get a list of unique values
unique_species = unique(table=input_species_shp, field=species_attribute)
Note
If your data is in Geodatabase, you can use DISTINCT operator in a sql_clause that you can pass to the SearchCursor (see help).
Hint
Updating rows
If you need to update rows using similar iteration approach, it is possible to do with UpdateCursor() -function
(see help).
Selecting data
Now that we have a list of unique species values we can iterate over that list and select all rows that correspond to a selected species and then rasterize those rows (polygons).
Before we can do selections in arcpy, we need to “prepare” the selection by creating a temporary feature layer (enables to make selections) using MakeFeatureLayer_management() -function
(see help):
#--------------------------------------------------------------------------------------------------------------------------------
# 5. Create a feature layer from the shapefile with 'MakeFeatureLayer_management' method that enables us to select specific rows
#   Method info: http://desktop.arcgis.com/en/arcmap/latest/tools/data-management-toolbox/make-feature-layer.htm
#--------------------------------------------------------------------------------------------------------------------------------
species_lyr = arcpy.MakeFeatureLayer_management(in_features=input_species_shp, out_layer="species_lyr")
Now the feature layer “lives” temporarily in the variable species_lyr that we use for making the selections.
Next, we can start iterating over those unique species that are stored in unique_species -list and select rows with SelectLayerByAttribute_management() -function (see help)
based on the species name (in a similar manner that you would do with SelectByAttributes -query
in ArcGIS, and save those selections into separate Shapefiles using CopyFeatures_management() -function (see help).
#---------------------------------------------------
# 6. Iterate over unique_species list and:
#   6.1) export individual species as Shapefiles and
#   6.2) convert those shapefiles into Raster Datasets
#---------------------------------------------------

for individual in unique_species:
    # 6.1):
    # Create an expression for selection using Python String manipulation
    expression = "%s = '%s'" % (species_attribute, individual)

    # Select rows based on individual breed using 'SelectLayerByAttribute_management' method
    # Method info: http://desktop.arcgis.com/en/arcmap/latest/tools/data-management-toolbox/select-layer-by-attribute.htm
    arcpy.SelectLayerByAttribute_management(species_lyr, "NEW_SELECTION", where_clause=expression)

    # Create an output path for Shapefile
    shape_name = individual + ".shp"
    individual_shp = os.path.join(output_folder, shape_name)

    # Export the selection as a Shapefile into the output folder using 'CopyFeatures_management' method
    # Method info: http://desktop.arcgis.com/en/arcmap/latest/tools/data-management-toolbox/copy-features.htm
    arcpy.CopyFeatures_management(in_features=species_lyr, out_feature_class=individual_shp)
Convert Polygons to raster
Now we are saving the species into separate Shapefiles which we can convert to rasters using PolygonToRaster_conversion() -function (see help).
Let’s also send information to the user about the process with AddMessage() -function (see help). Let’s add the following lines in the same loop that we started previously:
# 6.2):
# Create an output path for the Raster Dataset (*.tif)
tif_name = individual + ".tif"
individual_tif = os.path.join(output_folder, tif_name)

# Convert the newly created Shapefile into a Raster Dataset using 'PolygonToRaster_conversion' method
# Method info: http://desktop.arcgis.com/en/arcmap/latest/tools/conversion-toolbox/polygon-to-raster.htm
arcpy.PolygonToRaster_conversion(in_features=individual_shp, value_field=attribute_name, out_rasterdataset=individual_tif)

# Print progress info for the user
info = "Processed: " + individual
arcpy.AddMessage(info)
Sending messages to the Script tool
It is possible to “print” stuff to the user from arcpy scripts as well. We can use AddMessage() -function (see help) to send
any kind of messages to the user who uses the Python tool that we have created and use from ArcGIS Toolbox.
Let’s add a final message for the user that the process was successful.
# 7. Print that the process was finished successfully
info = "Process was a great success! Wuhuu!"
arcpy.AddMessage(info)
The full script
Here is the full script that we prepared previously:
# Import arcpy module so we can use ArcGIS geoprocessing tools
import arcpy
import sys, os

input_species_shp = arcpy.GetParameterAsText(0)
output_folder = arcpy.GetParameterAsText(1)
species_attribute = arcpy.GetParameterAsText(2)
attribute_name = arcpy.GetParameterAsText(3)
presence_value = arcpy.GetParameterAsText(4)


# 2. Add a new field into the table using 'AddField_management' method
arcpy.AddField_management(in_table=input_species_shp, field_name=attribute_name, field_type="SHORT")

# 3. Update the presence value for our newly created attribute with 'CalculateField_management' method
arcpy.CalculateField_management(in_table=input_species_shp, field=attribute_name, expression=presence_value)

# 4. Get a list of unique species in the table using 'SearchCursor' method

# 4.1 CREATE a function that returns unique values of a 'field' within the 'table'
def unique_values(table, field):

    # Create a cursor object for reading the table
    cursor = arcpy.da.SearchCursor(table, [field]) # A cursor iterates over rows in table

    # Create an empty list for unique values
    unique_values = []

    # Iterate over rows and append value into the list if it does not exist already
    for row in cursor:
        if not row[0] in unique_values: # Append only if value does not exist
            unique_values.append(row[0])
    return sorted(unique_values) # Return a sorted list of unique values

# 4.2 USE the function to get a list of unique values
unique_species = unique_values(table=input_species_shp, field=species_attribute)


# 5. Create a feature layer from the shapefile with 'MakeFeatureLayer_management' method that enables us to select specific rows
species_lyr = arcpy.MakeFeatureLayer_management(in_features=input_species_shp, out_layer="species_lyr")


# 6. Iterate over unique_species list and:
#   6.1) export individual species as Shapefiles and
#   6.2) convert those shapefiles into Raster Datasets

for individual in unique_species:
    # 6.1):
    # Create an expression for selection using Python String manipulation
    expression = "%s = '%s'" % (species_attribute, individual)

    # Select rows based on individual breed using 'SelectLayerByAttribute_management' method
    arcpy.SelectLayerByAttribute_management(species_lyr, "NEW_SELECTION", where_clause=expression)

    # Create an output path for Shapefile
    shape_name = individual + ".shp"
    individual_shp = os.path.join(output_folder, shape_name)

    # Export the selection as a Shapefile into the output folder using 'CopyFeatures_management' method
    arcpy.CopyFeatures_management(in_features=species_lyr, out_feature_class=individual_shp)

    # 6.2):
    # Create an output path for the Raster Dataset (*.tif)
    tif_name = individual + ".tif"
    individual_tif = os.path.join(output_folder, tif_name)

    # Convert the newly created Shapefile into a Raster Dataset using 'PolygonToRaster_conversion' method
    arcpy.PolygonToRaster_conversion(in_features=individual_shp, value_field=attribute_name, out_rasterdataset=individual_tif)

    # Print progress info for the user
    info = "Processed: " + individual
    arcpy.AddMessage(info)

# 7. Print that the process was finished successfully
info = "Process was a great success! Wuhuu!"
arcpy.AddMessage(info)
Now, we have a script that we can use from our Toolbox in ArcGIS! Let’s next see how it can be used.